How to Build A Jack Bench Workstation for the Shaper Origin
This is the second article in a two part series about the workstation that I designed for the Shaper Origin. You can download plans/files for it here. The first article described the features of my workstation design. This article will make more sense if you’ve already read the first blog article that I wrote about this. You can get an even better understanding of this design by watching the two videos. At least that is my hope!
In this article, I will tell you about:
- Workstation hardware: tee tracks, clamps, etc.
- List of plywood and hardware required
- Things I learned during the build process
- How the design evolved and improved
- What you need to know about the plans/files before building one for yourself.
- Tricks on mounting the workstation to the workbench
- Links where you can buy the necessary hardware
Workstation Hardware
Workstation Tee Tracks
I’ve had about 4′ of unused blue painted tee track in my shop before I started this project. This tee track was .75″ wide and .50″ thick and I made the mortises in the Sketchup file to fit tee track of that size. I didn’t have enough of that blue tee track, so I ordered some what I thought to be standard tee track. That was .74″ wide and .38″ deep. Close enough in width, but the depth was completely different.
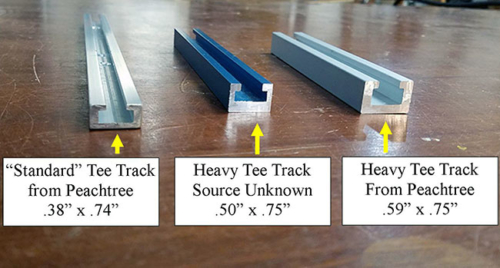
Later in the design, I tried using tee track as the rear support piece for the Shaper Origin. The span across the inside of the workstation is 20″ and the “standard” tee track wasn’t strong enough to support the machine without bowing. I then bought some heavy duty tee track from Peachtree. This was strong enough and it worked well, but again, it was a different size than the others.
The bottom line is that tee track comes in different sizes, so no single Sketchup file will work with every different brand of tee track. Most of them are about .75″ wide, but the depth varies a lot. You will have to cut the mortises for the tee track to fit whatever particular tee track that you happen to have.
Workstation Clamps and Retainer/Tee Bolts
I love cam clamps! They make locking pieces in place much easier, um, “most” of the time.
Initially, I bought cam clamps to secure the horizontal support to the main body of the workstation. In reality, they were a waste of money. In practice they were much more cumbersome and difficult to use than a regular tee bolt with a plastic knob.
These Cam Clamps that I bought for the Shaper Origin Workstation didn’t work out. I found that regular plastic knobs worked better in this application.
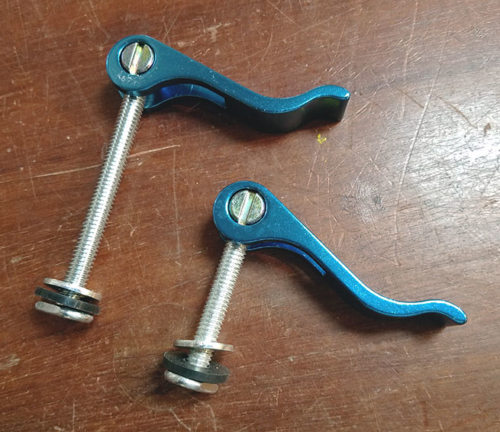
On the other hand, I bought a different style of cam clamp to secure horizontal work pieces and I love them. The ones that I bought are from Shop Fox and I bought them off of Amazon. These are nice, heavy duty clamps. They push the work in and down at the same time, which is a very nice feature. One big caveat though is that they’re built with very poor quality control. Some work right out of the box and others need some tweaking before they’ll work properly.
The Shop Fox cam clamps are great, but they often need some work before you can use them
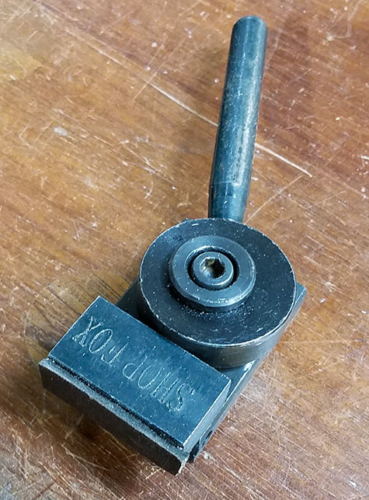
The handle on these clamps rotates around a hollow insert piece. That insert fits into a recess in the base of the clamp and a bolt goes through all three pieces to hold it together. Tightening that bolt tightens the clamp in place on the tee track. The handle is supposed to float around the insert even when the bolt is tightened down. On one of my clamps the handle bound up when I tightened the clamp down. I discovered that putting a thin washer under the insert piece kept it from binding. It worked great after that.
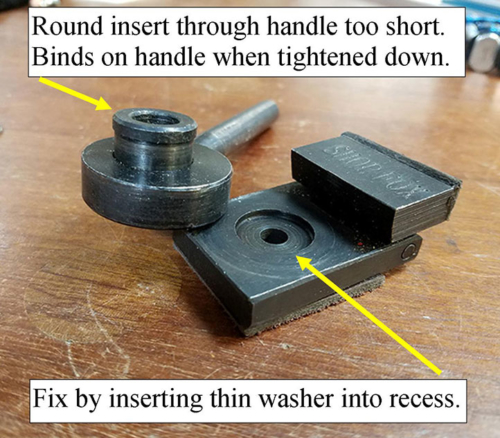
The handle on the Shop Fox cam clamps bound up when I tightened it to the tee track. This is how I fixed that.
Workstation Hold Down Clamps
I used standard tee track hold down clamps to secure work in the vertical position and they work great.
Standard Tee Track Hold Down Clamps Work Great
Latches for the Vertical Stop
I used spring loaded latch clips to hold the vertical stop piece in place. These are easy, simple, and perfect for this application.

Workstation Design Changes
I made a lot of changes to my original design after I actually started using the workstation. There’s nothing like a test drive to show you where improvements can and should be made. Most of the changes that I made from the original design don’t show in the final design. But, there are a few obvious ones that you should know about.
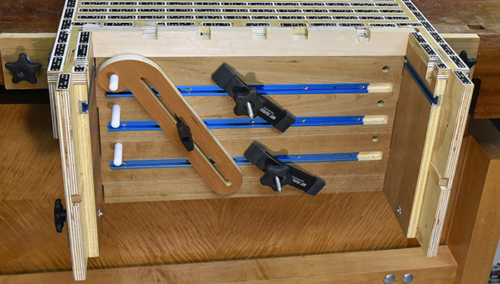
The Shaper Origin, or any router for that matter, can tip if you’re cutting close to the edge of the work piece. My idea for how to prevent this was to support the rear side of the Shaper Origin with a sliding support piece. It would have two tee bolts on each end and the whole thing would slide along tee tracks mounted inside the workstation. I had some small clamps that pushed against the extension wings to hold it in position.
That worked fine, but had to be rather thick/tall for it to ride in the tee tracks. That prevented me from using it for anything that was less than 2.5″ thick. Changing to the current design where the support piece rests in slots along the sides of the workstation allowed me to get this down to 1.5″. It also allowed me to use a single piece of heavy tee track as a support for work as thin as 5/8″.
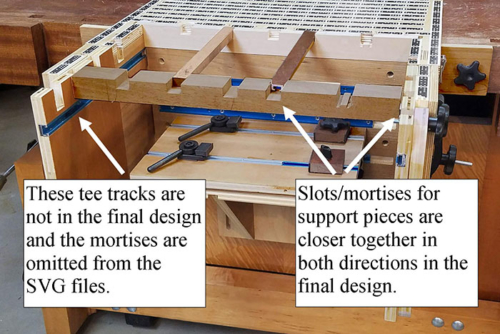
Changes to final workstation design
After I started using the workstation I realized that the auxiliary table could have and should have been larger. The one in the photo (above) is 15″ wide, but the one in the plans/drawings is 18″ wide. I think the larger size is much more useful.
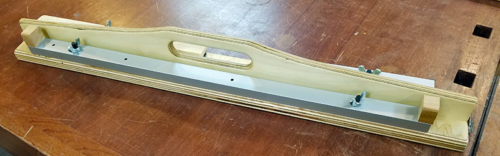
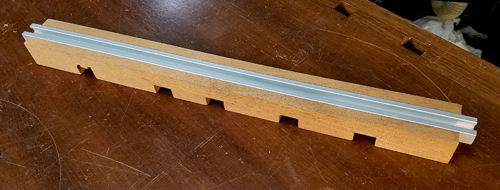
I use a piece of heavy duty tee track to support the Shaper Origin when working with thin pieces
Please note that the tee track/support piece has a small wooden block screwed in at each end. (see photo below) These fill space in the mortises and bring the surface up flush with the tape field.
Tee track/thin support piece stored on the vertical stop/handle
More about the Movable Rear and Side Support Pieces
As I mentioned it the section about tee tracks, I used a heavy duty piece of tee track for the movable rear support piece. That worked so well for supporting the Shaper Origin when working with thin materials that I started using it for all of the movable support pieces.
I later realized that aluminum tee track (or something equivalent) is only necessary for long spans. Any piece of wood cut to fit will work for the shorter spans.
I reinforced this movable support piece with some heavy duty tee track
The bare piece of tee track is only for use with thin material. The primary movable support piece is thicker and lets me add movable side supports. I fit a piece of hardwood inside the workstation for this piece. I then fit a second piece of tee track in a dado on the bottom. It works perfectly, but in hindsight I wonder if a good piece of hardwood made to fit would be strong enough without adding the tee track.
Mounting Workstation to my Workbench
Screwed Directly into Workbench
I like the idea of screwing the workstation right into the side of my workbench. I saw another workstation on the Shaper Hub with that feature and I definitely wanted to include that in my design.
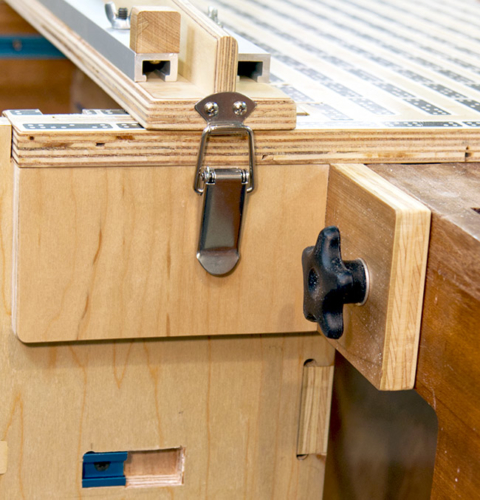
Workstation screwed directly into workbench
I used a 3/8″ thread tap that is specifically designed to work in wood to tap some threads into the side of my workbench. But, you can use a regular tap from one of the big box stores if you want. I didn’t want to lose track of the bolts for this, so I used what I think is a really cool trick for keeping bolts “captive”.
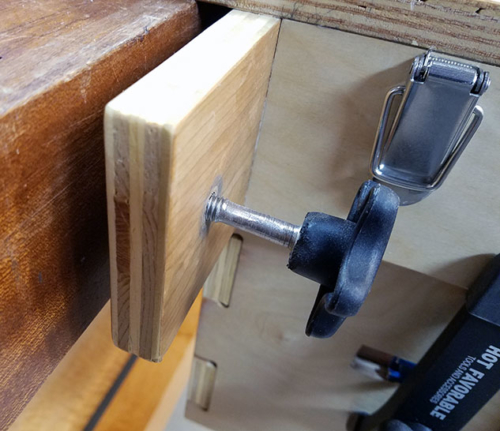
Threads ground off of bolt
I tapped 3/8″ threads through the tabs on the side of the workstation. Then I ground the treads off of the bolt in an area a bit larger than the plywood is thick. Those bolts will then float in the plywood when they are screwed all the way through the threaded tabs. They can’t fall out because you have to unscrew them to remove them.
More Support
Screwing the workstation into the bench worked good, but only for light work. I then drilled a hole on the farthest corners of the tape board. Driving a few sheet rock screws through those holes into the top of my bench made a huge difference, and it was much more solid.
Even More Support!
Screws in the bench top and the bolt in the bench side made it pretty solid. This workstation holds work up to 20″ long and 12″ wide. That creates a lot of leverage when it’s at capacity. In that circumstance the two screws and the two bolts were okay, but with the extra weight it could flex just a tiny bit.

I added some simple braces to the sides of the workstation. I drilled a hole in the side of the workstation and installed a 1/4″ tee nut. Then I measured the distance from that hole to the side of my bench. I then drilled a hole in a short scrap of wood and cut it so that when it was bolted to the workstation that it butted against the side of my workbench.
With the brace in place it is ROCK solid.
This brace is not included in the drawings because your bench might be different than mine. If you don’t have sides on your bench then maybe you would extend it down to the floor. It’s a pretty simple and honestly, I only use the braces when I’m working on a large piece.
Confession Time
Adding the screws into the top of the bench and the braces on the side of the workstation are really effective in holding the workstation in place. Given this, you could probably omit the tabs and the bolts going into the side of the bench. I left them in the plans, though because I like them!
Lessons Learned while Building my Workstation
This was my first big project with the Shaper Origin and I learned a few things along the way. Most of what I learned had to do with software and the Shaper Origin interface. I talk more about those in the next section.
A few other things I learned that are worth mentioning are:
Tight Joints = Tougher Glue Up
I got carried away with making precise tolerances where the plywood interlocked together. Unfortunately, those joints were generally too tight. Everything worked ok, but the glue up was more difficult than it had to be. I’m a bit embarrassed to admit this, because I know better, but that’s what happened.
A Faster Router Bit?
A standard 1/4″ upcut router bit may not be the best choice for all those plywood cuts. I bought a “roughing bit” and it seems to cut much faster than the one that came with my Shaper Origin. It probably doesn’t cut as cleanly, but it’s not obvious if it does.
Cut Strategy
It seemed to me that using the Shaper Origin AFTER I cut most of the pieces with the table saw would be faster and more efficient. After cutting all of the pieces this way I’m not sure if that is true or not. If I used the Shaper Origin to cut all of them from large pieces of plywood then I would spend a lot less time creating grids, changing cutting depths, offsets, etc. I’m really not sure which is faster. I would love to hear your thoughts on this!
Don’t cut too deep. The supposed rule of thumb is “don’t cut deeper than the diameter of the router bit” So, not more than 1/4″ on each pass if you’re using a 1/4″ router bit.
Try a slower speed. I typically set the speed on my router based on the diameter of the bit. Small bits, fast speed. Large bits, slow speed. That’s not necessarily the best way to go. Sometimes it’s better to slow the bit down, especially when making deep cuts.
Software
This article is not really about software, but software is at the heart to the Shaper Origin. Therefore, I will briefly describe the software I used for this and a bit about what I learned while using it.
I used four different software packages for the workstation design:
- Sketchup
- Face SVG which is a sketchup plugin that allows you to export SVG files from sketchup.
- Adobe Illustrator CS6
- Affinity Designer
Sketchup is like an old friend to me. I like using it and I did most of the design with this program. The Sketchup file in the download will be helpful if you want to modify the design to suit your own purposes.
Vector Drawing Programs
Illustrator CS6 was the last version that you could buy outright before Adobe forced everyone to purchase through a subscription. I also bought Affinity Designer because it was inexpensive and it has good reviews. Affinity has a more modern feel and a nicer interface than my old version of Illustrator. In spite of this, I was more proficient with Illustrator than I was with Affinity Designer.
Sketchup Plugin to Export SVG Files
The Face SVG plugin is free, but the developer requests an $18 donation. The value that I got out of this little plugin was well worth the $18, and a small price to pay for all of his hard work. That said, it didn’t always work properly.
Face SVG supposed to add corner reliefs to mortises and that didn’t always work. Of course, I might have been doing something wrong, but sometimes I could get it to work and sometimes I couldn’t.
Also, the SVG’s didn’t always export properly. I had better luck exporting to Illustrator than I did with Infinity Design, but it wasn’t consistent. Usually, the problem was that the exported file would be at the wrong scale. Through perseverance I was able to make it all work and ultimately, I got a very good result.
What You Need to Know About the Files for this Workstation
The download includes a Sketchup file for the workstation, an SVG file with pieces laid out on a 4′ x 4′ piece of plywood, and another SVG file with additional pieces laid out on a 2’x2′ piece of plywood. I also include drawings for the few important pieces of hardwood.
Some of the pieces require cuts on both sides. Once they are cut from the larger sheets of plywood you will have to make a few cuts on the opposite side. For those pieces I provide separate SVG files for each of them.
Many people may not need this, but I think some might prefer to cut each piece out separately rather than from larger pieces of plywood. For them, the download includes a separate folder with individual files for each piece.
As I mentioned in the first article about the workstation, I did not write a specific set of instructions for this in the same way that I did for my Adjustable Height Workbench Plans. I believe that between these two articles, the two videos, the 3d Sketchup drawing, and the text in the SVG files that you will have no trouble building one for yourself.
Materials List
| 1 | 4′ x 4′ piece of 3/4″ plywood (or equivalent) |
| 1 | 2′ x 2′ piece of 3/4″ plywood (or equivalent) |
| 1 | 1.5″ x 2.5″ x 19.75″ piece of hardwood |
| 4 | Small scraps of hardwood 3/4″ thick |
| 2 | 5/16″ Tee Track Hold Down Clamps |
| 2 | Spring Latches for Vertical Stop |
| 2 | Shop Fox Cam Clamps |
| 1 or 2 | 21″ piece of Heavy Duty Tee Track for movable support piece |
| 96″ | Tee Track to accommodate 1/4″ or 5/16″ tee bolts |
| 2 | 3/8″ x 1.5″ Star Bolts – for bolting to workbench |
| 5 | 5/16″ x 1.5″ tee bolts with knobs – Securing horizontal support platform, for securing angle stop piece in position, and for stop blocks on auxiliary horizontal support. 1/4″ would also work for stop blocks. |
| 8 | 5/16″ x 2.5″ tee bolts with knobs for extension wings and for securing auxiliary horizontal piece in place |
| 4 | Either 1/4″ or 5/16″ x 2″ Star bolts with tee nuts for securing braces, and for storing angle stop and extra support piece onto extension wings. |
| 6 | 1/4″ x 1.5″ bolts with wing nuts to store support pieces on Vertical Stop |
Videos
I made two YouTube videos about my workstation. The first video describes the features of the design. The second video is complementary to this blog article about the workstation and focuses more on how to build one for yourself.
Thank You
Thanks for sticking with me through both articles and, hopefully, the two videos. I hope you found value in these and in my workstation design. As with my workbench plans, I am happy to answer any questions that you might have while building your workstation. Also, please let me know how it turns out!!
